Mobile applications have become a most significant part of our lives. App testing was one of the most significant things before it was launched in the market. App testing permits you to gather feedback from individuals, which helps you enhance your mobile app development. This article will provide complete information about closed testing, which supports mobile app developers in making their development more precise and attractive to their valuable clients and organizations. Let’s dive deeper into it.
What is Closed Testing?
Close testing is most useful for testing applications with many testers to collect more targeted feedback and comments. The tester can also use the individual’s email or Google Groups in the testing squad. However, for adding Google groups, the format will be Yourgroupname@googlegroups.com.
When development is done with close testing, it will go into the review phase and permit you to test the app. Also, testers have the power to share ratings and review the app via Google Play Console. That review will not be visible to the general public and will not impact your app’s ratings. Thus, if you are testing any paid app, then testers of that app need to buy it from Google.
What are the steps of adding a user to the closed test?
Google has applied the new app publishing policy for individual app programmers. From November 13, 2023, any experienced Google Developer Accounts will need 20 internal testers to test their app for a minimum of 14 days before they can unlock the production tab demanded for publishing.
If your organization account is under registration, you must follow this process and the Production tab that is automatically available. They will opt for 14 days to publish your application or game on the Play Store. It helps the developers make better apps by getting early feedback from users.
STEP 1: DEVELOPING CLOSED TESTING
Log into your Google Play Console. Now, you can click on the view app option.
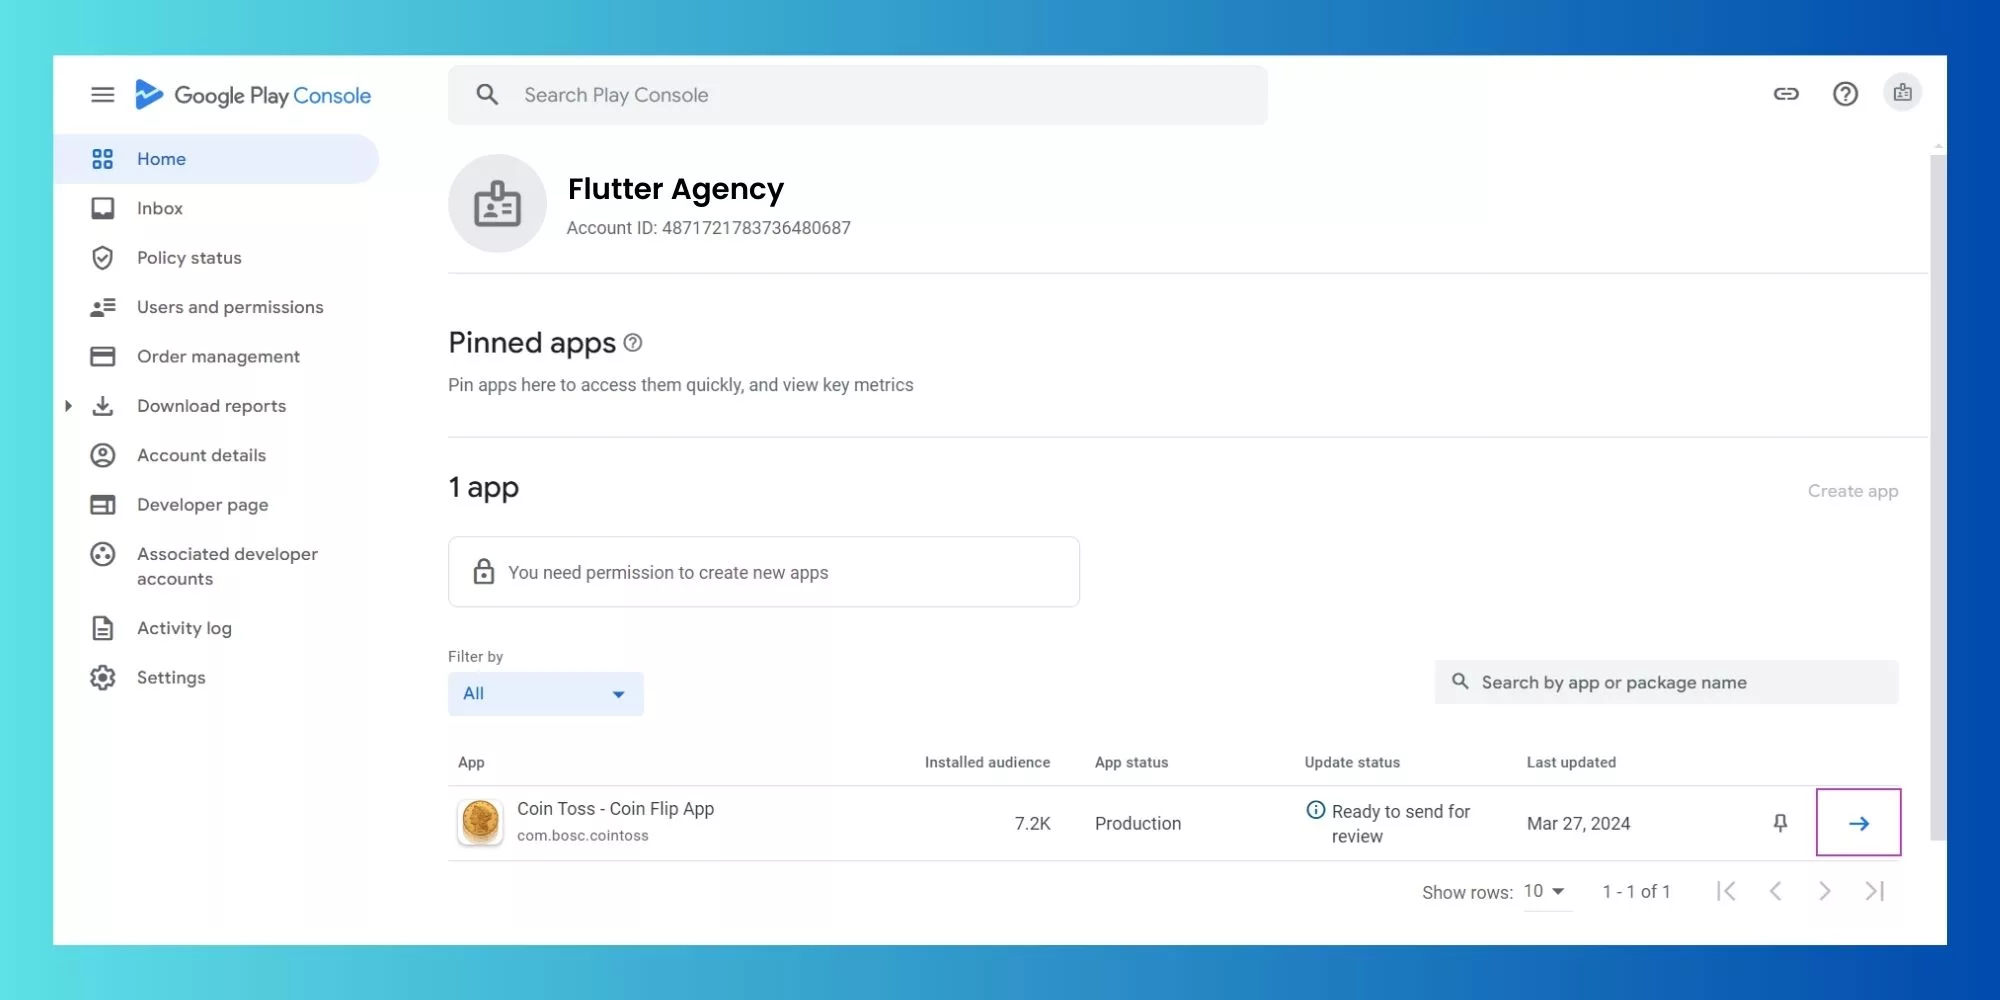
In the release section in the left sidebar, click on Testing> Closed Testing.

After clicking on closed testing, you must select from Active tracks. If you have an existing track, click manage the track. If you want to run various tests, you can click on Create Track.

You must write the track name and hit the Create track button.

STEP 2: SETUP THE CLOSED TESTING TRACK
Closed tracking in the Google Play store allows app developers to invite individuals or groups of users for Testing before applying to publishing. It aids in finding and fixing errors, enhancing user interfaces, and improving the overall app quality depending on the feedback you get from your limited targeted audience.
Now, you need to click the tab for the countries or regions, and after that, add countries or regions.

Now, choose the countries where you wish your app to be available, or you need to click the first box to add all the countries.

STEP 3: ADD TESTERS TO TEST YOUR APP
You can add testers in Google Play when you’re making an app and want to get some feedback on it. This means you’re inviting specific people to try out your app before it’s available to everyone. You can either have a closed test where you add testers by email, a join link, or an open test where anyone can join. Testers will get an invite to try your app and give you feedback so you can fix any problems before releasing it to everyone.
Want to help make apps better? You can join as a tester without needing an invite. This helps get more feedback to ensure the app is top-notch before it officially launches.
You need to click on the Testers tab and select your email list. You can even create a new list to add more email addresses. Let’s make these apps awesome together!

If you’re signed up as a solo developer rather than a group, jot down the name of your list, add some email addresses, and save your changes. Remember to add at least 20 emails under the “Add Email Addresses” section.
Google now needs 20 people to agree to be testers for your closed test, so keep that in mind when setting up the testing requirements.

Now, you are required to tap on the Create button.

Check out the Email List you’ve created. In the Feedback section, type in a website link or email address where testers can tell you what they think. Then, click on Save. A window will pop up, so click the Go to Overview button.

If you want to send a link to testers who are joining your app on Android or the web, you can copy the link and share it with them.
But wait! You can only do this once Google finishes checking and approving the release you sent in. The option to copy the link will be grayed out, and you can use it later.
Now, let’s go ahead and click on the “Create new release” button.

STEP 4: MAKE NEW RELEASE
When you release your app on Google Play, you need to ensure that all is set to go properly and work smoothly. This will help the users to get the best experience possible.
To do this, you need to upload the app file that you have got from the WordPress framework or add it from your library under App bundles.

Now, select and click on the “Add To Release” button.

When filling out the Release details section, the release name should automatically show the app’s version number. In the Release notes, you can write any information you want the testers to know. You can even copy and paste that version’s official Flutter Agency App release notes. After that, click the Next button to move on.

Then tap on the “Save” button.

After that, you will see a pop-up window in which you need to hit the “Go to overview” button.

Then click on “Send 16 changes for review.” You will see a list of changes.
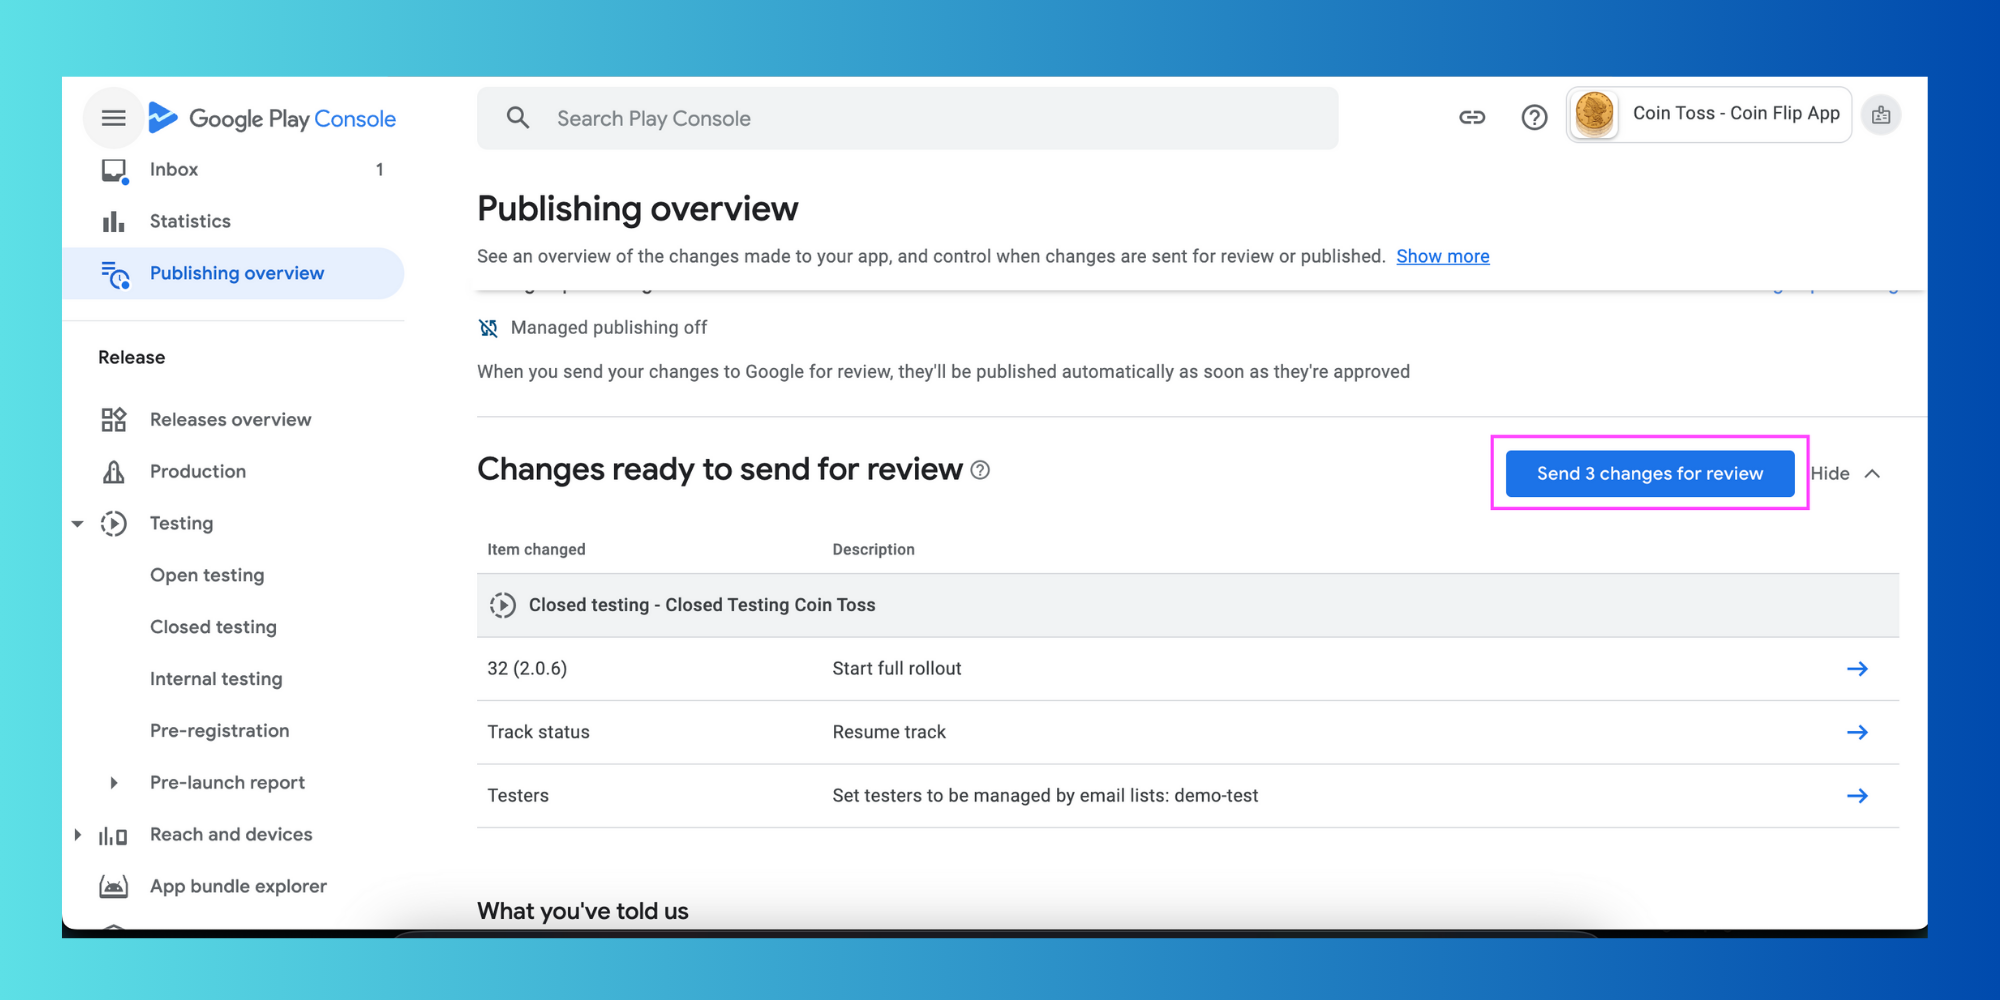
When you’re done making changes, a little box will pop up on your screen. Just click the button that says “Send changes for review.” Then, your app will be sent to Google for users to check out. It might take a few days, but hang tight, and soon, Google will give your app the thumbs up.

STEP 5: TESTING A LICENSE
Getting your app licensed in Google Play Console is most important because it ensures that only the people who bought or downloaded your app can use it freely. This helps you to protect your money and ideas from being stolen or used without permission.
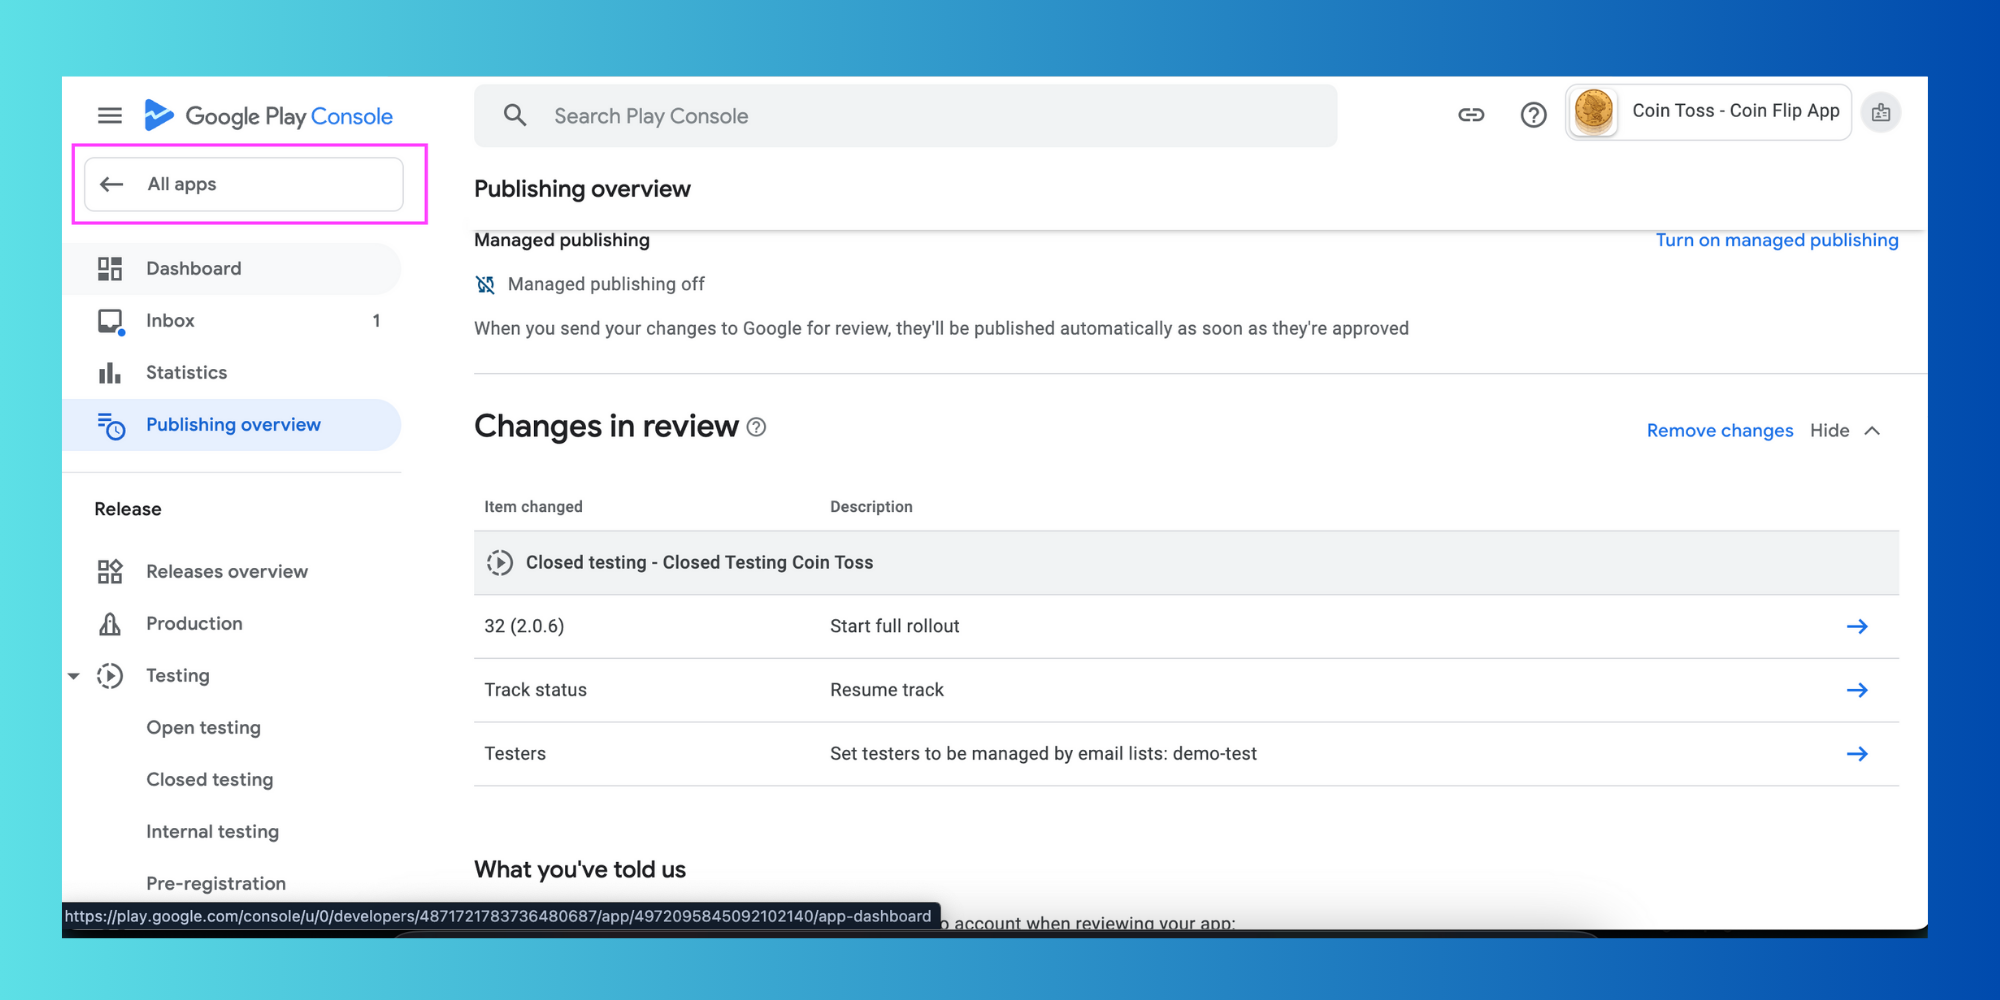
While you wait for your app to be reviewed, you can continue working on other projects. If you want to return to the main menu, tap on “All apps” at the top of the left side of the screen.
You need to tap on “License Testing” under the setup in the sidebar.
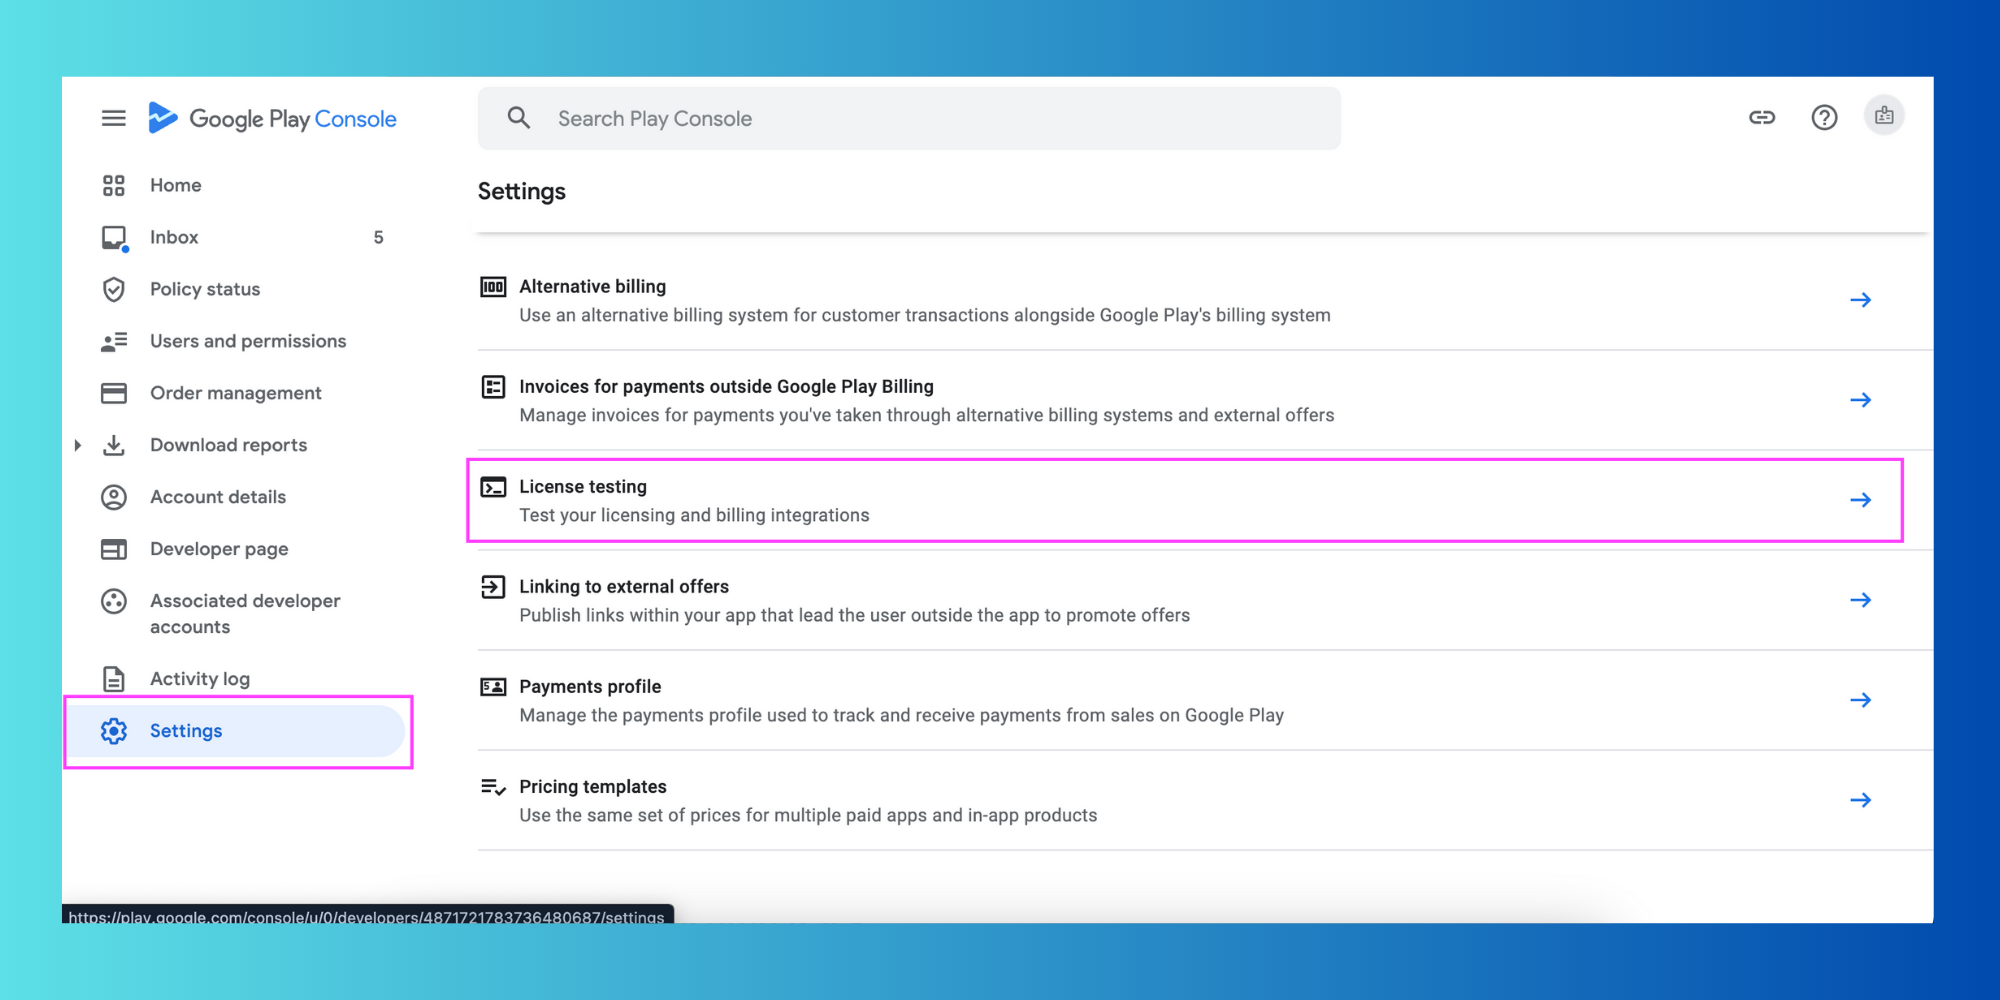
Opt for the license testers from an email list and hit the save changes button in the Google Play Store.
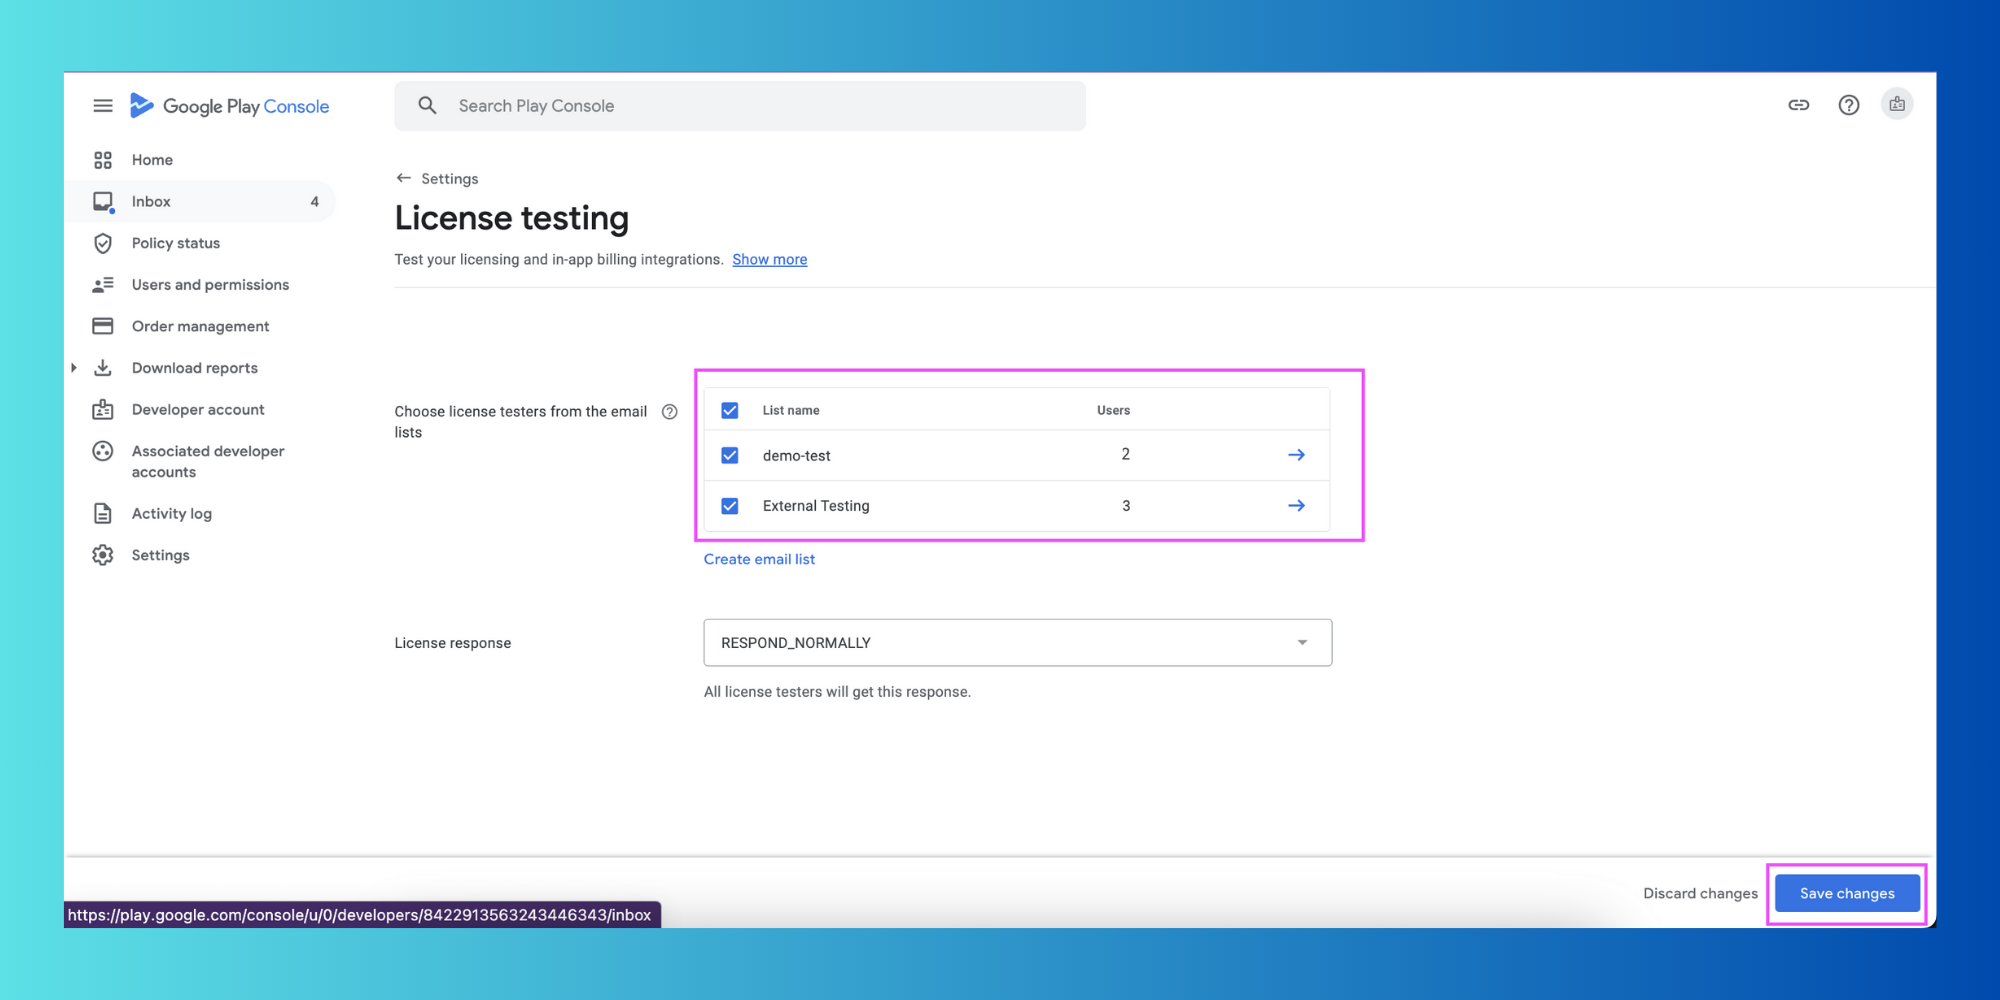
Finally, you need to click on the save button.
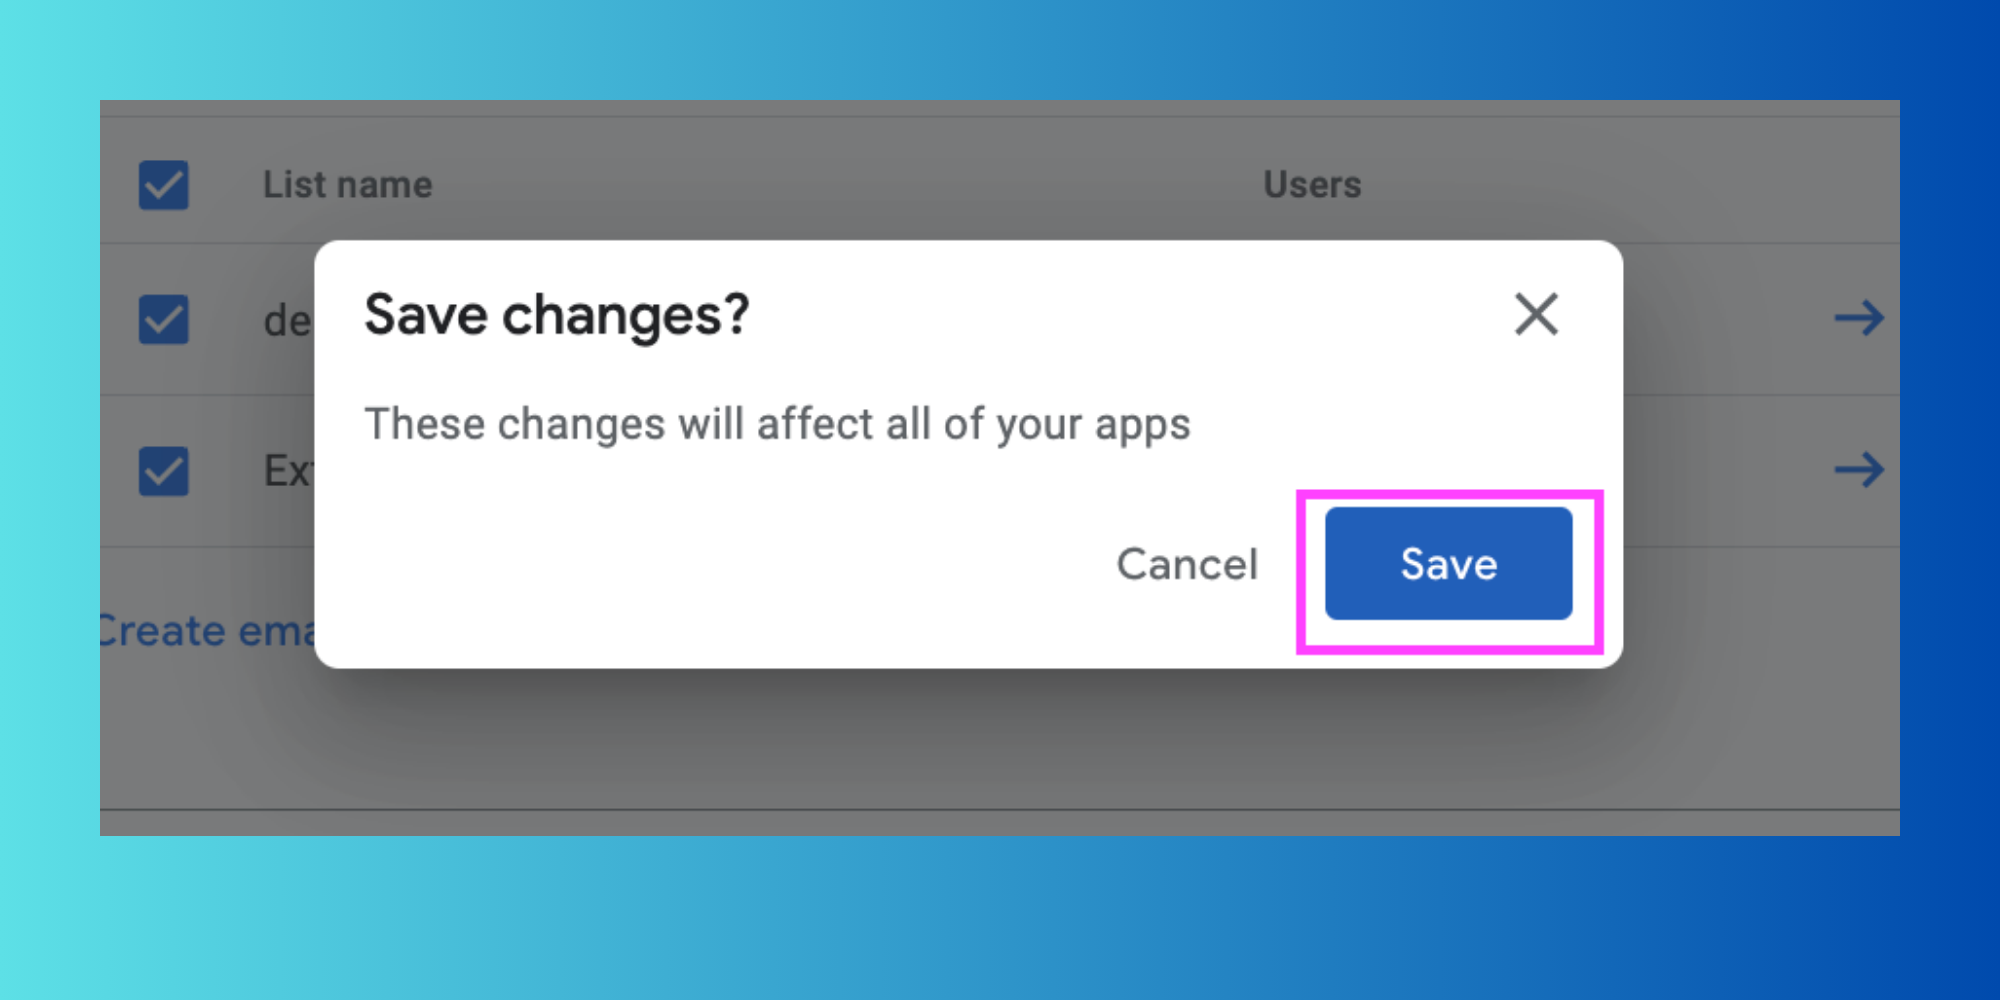
Hence, in this way, your application can perform closed testing, which is only done by the Google Play Store.
After the release is approved by the Play Store, you can share the link with the tester so that they can start the performance testing your mobile app. After 14 days of testing, you need to apply for accessibility to production.
ARE YOU READY TO USE CLOSED TESTING FOR YOUR APP
We'll Be More Than Happy To Help
Steps of Android Plays Store Testing Policy for Individuals
The Google Play Store has integrated the latest and advanced testing needs for the individual programmers who have created their app developer accounts after November 13, 2023. The main objective of this testing is to deliver high-quality standards for the apps that are published on the Google platform. Let’s see some of the steps below.
STEP 1: MAKE USE OF AN INTERNAL TESTING
Before you release your app to everyone, it’s a good idea to do some closed testing on your own first. This will aid you in finding any problems or mistakes before many people use it. You can use the Play Console to invite up to 100 people to test your app before it’s officially released. In this way, you will get feedback and ratings from people you trust, like your friends or family. They can tell you what works well and what needs fixing! Even if you plan on charging for your app later, this testing phase helps improve the efficiency of the application.
STEP 2: SET UP A CLOSED TEST FOR MANDATORY FEEDBACK
Here’s the scope of the new rule for solo mobile app developers. Instead of testing your app with your friends and relatives, you have to pick some testers from outside your development team. These lucky testers will get a special invite from the Google Play Store to try out your app before it’s available to everyone in the general public.
STEP 3: INCLUDE A MINIMUM OF 20 TESTERS
It’s important to have many testers in your closed test. Google Play says you need at least 20 testers to join in. But just putting their names on the list is only part of what you have to do. The testers have agreed to participate in your closed test, which shows they’re ready to try out the app and share their thoughts.
STEP 4: COLLECT FEEDBACK AND IMPROVE
This policy is all about making sure that testing done by people is of good quality. You must have at least 20 testers committed who will be using your app for two weeks. In this way, they can dig into all the features and functionalities of your app. All that is they have to catch any problems that might pop up when people use it daily.
STEP 5: APPLY FOR PRODUCTION RELEASE
Once you’ve completed the closed testing phase and fulfilled the minimum requirements, you can confidently submit your app for production release in the Play Store. The Google Play review process will take the consideration all gathered comments and feedback from your close testers and your app’s overall quality. You will also need to Play Store policies. Therefore, you need to conduct a thorough closed test, so that you will increase your chances of a smooth review and a successful launch on the Google Play Store.
NEED HELP? LET’S TALK
Looking For a More Extensive Mobile App, or Expert Help Running Your App?
What are the Steps involved in the Android Play Store Testing Policy for Organizations?
The Google Play Store knows that companies and groups making apps have different needs than people making apps on their own. They have a special policy that lets organizations test their apps before they are available to everyone. This helps make sure the app is really good and easy to use.
1. PICKING THE BEST TESTING OPTION:
Closed Testing: Organizations can ask a select group of people outside the company to try out the app before it’s officially released. Unlike individual accounts, organizations can choose who they want to test the app and get specific feedback.
Internal Testing: This lets people within the organization try out the app. Employees can give different opinions on how well the app works and if there are any problems. There’s no limit to how many people can be included in the internal testing process because it helps an organization for analyzing the application.
2. SETTING UP MANAGED GOOGLE PLAY (OPTIONAL):
If your organization decides to use Managed Google Play, you’ll have an easy and simple testing out of apps before they go live on the Play Store for the general people. With this testing service of Google, you can create your private app store only for your organization. This makes it easy to test apps internally and get feedback from your QA team. It will aid you to release the app better than your competitors.
3. LISTENING TO FEEDBACK AND MAKING IMPROVEMENTS:
No matter which testing method you choose, the main goal is to get helpful feedback to make your app better for the users. Encourage testers to give detailed reports on any bugs, crashes, or areas that need improvement in your app. Therefore, by making changes based on this feedback, your app will be more user-friendly and reliable when it’s released to the public.
4. GETTING READY FOR THE BIG RELEASE:
After all the testing is done and any issues are fixed, your app will be ready to launch on the Google Play Store. This final step will ensure that your app store listing will look good with screenshots and descriptions that show off your app to the real world.
How much time will it take for the Play Store to review closed testing for individual and organizational accounts?
Getting your app on the Google Play Store is the most complicated process, so you want to make sure it’s really attractive and creative to the users who are going to use this app. Google has a strict process for checking out all the apps, even if the app is in the testing phase. It might take a while for them to look at your app, but if you know what they’re looking for, you can make sure the best mobile app for a better user experience.
Here are some things to keep in mind:
1. App Complexity: If your app has a lot of complicated and unconfused features, then there are chances that it might take longer for Google to check it out before it goes live for everyone to use.
2. Update Frequency: If you keep sending the app updates all the time, it could slow things down because each new version has to be reviewed again by Google. So, before sending the new upgrade to the Google Play Store make sure your app is working well and has fixed all the bugs and errors by a QA team.
3. Play Store Workload: Sometimes, there are tons of apps being sent in at the same time, which can make the review process take a longer time and it may also increase the chances of complexity in the app.
INDIVIDUAL VS. ORGANIZATION ACCOUNTS:
Individual Accounts: Google usually looks at your app in a few hours to a few days. It doesn’t matter if you have an individual account or an organization account when it comes to how fast your app gets reviewed with features and functionalities.
Organization Accounts: While Google doesn’t guarantee quicker reviews for organization accounts, having a top-notch developer profile could make the process run more smoothly in the future.
If you know these things, you can make the testing process easier and get your app reviewed faster, whether you have your own or your organization’s account. Keep in mind that a skilled programmer will follow Google Play’s rules give users a good experience and get ready for everyone to use the mobile devices.
Why is my Google Play Store review taking so much time?
When several people are sending in new apps or updates all at once, then the team that checks them out might get busy examining the app. This means they might take longer to look at your app.
If your app is complicated, then you need to buy the plan in the app, or has ads, or need to look at private user info, it might take even longer for them to evaluate it.
Google Play has rules about what apps can do and how they should look. If your app doesn’t follow these rules, they might take a closer look at it, which could slow things down.
Google wants to make sure all the apps in the Play Store are really good. If your app has a lot of problems or keeps crashing, or if it’s hard for people to use, the review team might need more time to figure out what’s wrong.
Sometimes, Google might need more info from you to make sure you’re the owner of the app that you have developed.
If there are any mix-ups or questions between you and the review team, it could make the review process take longer.
Sometimes, there might be technical problems on Google’s end that cause delays in the review process of your business application.
If your app takes longer to get reviewed than expected, you can check the Google Play Console for updates. You can also try and consult with Google Play support to see if they can help speed things up.
Wrap-Up: Improve the App Quality Via Closed Testing and Launch the App
Closed Testing on Google Play is a super important step for app developers before they release their apps to the public. They get a group of people to test out the app and give feedback so they can fix any problems, make it easier to use, and ensure it’s a great app overall. This helps ensure the app is awesome when it’s officially released, which makes users happy and allows it to do well in the app store.
